A do-it-yourself, free-standing striking dummy.
by Ryan Gregory, May 26th, 2012As readers of this blog will know, I have been working on building a variety of training tools that can be added to my home dojo (“hojo”) in addition the standard store-bought equipment. So far, this has included two different types of makiwara, a breaking board holder, small punching bags, and other items (see here).
One of my favourite pieces of equipment is “BOB”, the Body Opponent Bag manufactured by Century. If you don’t know BOB, you should. It’s a free-standing striking dummy made of foam that has a distinct torso and head and allows for much more realistic striking practice, both in terms of power (vs. a training partner) and accuracy (vs. a heavy bag). The only downsides to BOB are that it can’t be struck from the back or below the torso (or, if you have the XL model, below the shorts) and the fact that it is quite expensive. (The best price I found was at The Treadmill Factory). If you want to have a 360-degree free-standing striking target with a separate head for accuracy and/or you are on a budget, the options are pretty limited.
I already have a BOB and a hanging heavy bag in my hojo, so technically I don’t need any more striking equipment. However, for practising against multiple opponents and for the purposes of developing something inexpensive that might be useful for my fellow martial artists, I decided to see what I could make. All in all, I am quite pleased with the results.
Here is what the finished striking dummy looks like:
Below, I provide some details on how I built this striking dummy.
Here is what you will need:
Supplies list
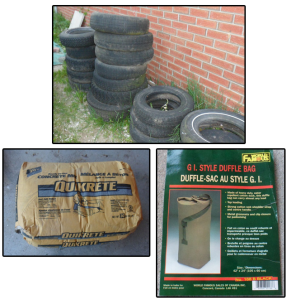
* Car tires (2). These can be obtained for free from an automotive repair shop.
* Concrete mix (4 x 30kg bags). These cost about $5.00 each.
* 2″ x 4″ x 8′ boards (3). These cost about $2.50 each.
* Large G.I.-style top-loading duffle bag (42″ x 24″). This can be obtained for $20 or less from an army surplus store. The strap should be cut off.
* Duct tape (2 x 45-yard rolls). These cost about $5 each.
* An old futon mattress. These can easily be found in classified ads for no more than $25, and sometimes they may even be free. Note that one mattress can make two striking dummies.
* Miscellaneous supplies: wood glue, screws, large nails, extra foam, pillow case, strong spring, small piece of plywood.
The total cost varies according to whether a duffle bag shell is used (you could get by using only duct tape) and what one has to pay for a futon mattress. The deluxe model would cost about $70 in materials, whereas a cheaper version (no duffle bag) might be $50 or less. Much lower than even the cheapest free-standing punching bags I have seen. With the size, weight, and separate head on this one, it’s much closer in functionality to higher-end models costing a few hundred dollars.
The first thing to do is make the centre post and base. For this, I glued and screwed three 2″x4″ boards together (two together and perpendicular to the third).
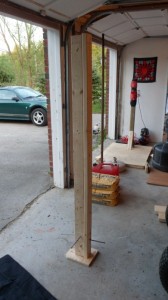
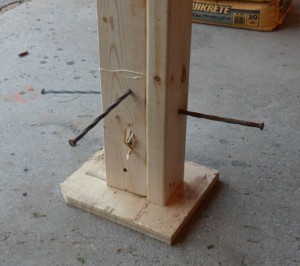
To help keep the post in place during and after the base is made, I glued and screwed a small piece of plywood to the bottom of the post. In addition, I drove some large nails through the post so that they stuck out in different directions. The plywood and nails are there to anchor the post permanently in the concrete. The post was then left overnight so that the wood glue could set.
I then placed the post inside two old tires and filled them with concrete. The concrete needs to be pushed into the empty spaces of the tires, and it’s important to wear gloves for this as concrete can cause nasty chemical burns due to its alkalinity. Once the tires were full and the level of the post was double checked, the concrete was allowed to set (about 48 hours).

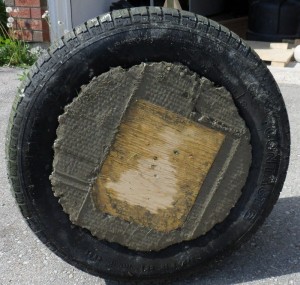
With four bags worth of concrete inside the tires, the base is now very heavy. It would take a pretty serious kick to knock this thing over. However, it is still portable if it is moved by tilting it low and rolling it along on the tires.
To make the striking surface, I used half an old futon mattress, which is basically just a canvas cover containing various types of foam and padding. I rolled this around the post and attached it with duct tape. Then the entire thing was covered in duct tape to keep it in place and to compress the mattress material to make it firm for striking.
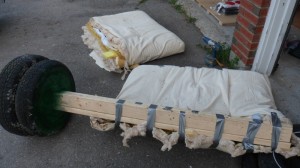

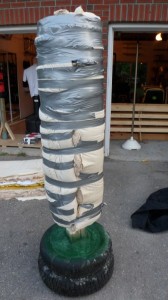
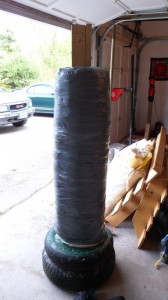
If one were not offended by the site of duct tape, one could stop here and have a perfectly serviceable free-standing bag. However, I wanted something that looked a little more professional and I also wanted to have a separate head on the dummy.
In order to add a head, I trimmed the post down and attached a block of 4″x4″ wood to it using a spring/garden hose connector that I had available. I simply drilled a hole into both the post and the block of wood, set the spring inside, and fixed it using some screws through the wood and the hose.
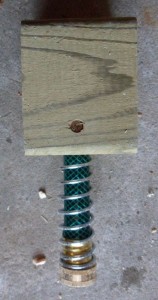

I then filled in the top of the futon, taped it over, and then added a foam collar under the block of wood. This helps to keep the head from wobbling too much. This was taped in place as well.

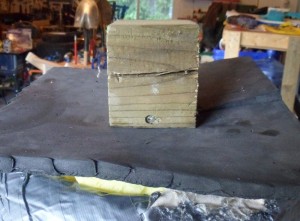

I then placed the duffle bag upside down over the taped futon. A small slit had to be cut in the bottom of the bag in order to get it over the block of wood. I worked the duffle bag down as far as it would go, then cut off the metal rings that would normally be used to tie the bag, and I attached it with black duct tape at the bottom.
To make the head itself, I used a piece of 2″x6″ and glued and screwed another piece onto it as shown in the picture below.
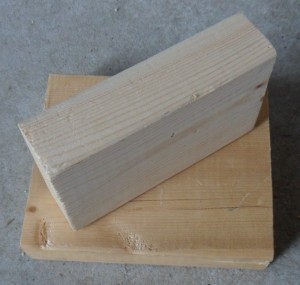
This was attached on top of the block of wood and then foam was used to build a round head around it.
I covered the wood with foam padding using a staple gun in order to prevent any injury from hitting wood, and attached it to the wood block. I then build up the head using foam and padding, sealed it with duct tape, and put a pillow case over it. I also placed foam around the bottom part of the block of wood to make a neck. Then the pillow case was attached using duct tape around the neck area.
As finishing touches, I spray-painted the visible parts of the concrete with black paint and I attached a foam mat to the bottom of the tire to make it quieter when the tire lifts off the ground slightly as the dummy is struck.
I have tested it out with some pretty hard strikes to the head and body, and I think it is quite solid. Between this one and BOB, my makiwara, and my heavy bag, I have lots of fun things to hit.



 Brazilian Jiu-Jitsu
 Kodokan Judo


I have to admit that I love seeing your home made equipment–I had an idea a while back for creating heavy bag arms so I looked it up to see if anyone else had done the same, and that’s how I came across your blog in the first place. I do hope you keep up both your training and your equipment making, because I find the posts regarding both to be quite valuable!
Hello Noah — thanks for the kind words. I am now following your blog as well. I quite enjoy manufacturing my own hojo undo equipment, and I think that is in the spirit of traditional Okinawan karateka who improvised some very creative training tools. The heavy bag arms are surprisingly uncommon, given how useful they are. I found the one that I purchased (it’s a very simple design using simple materials, it turns out) plus the one I tinkered with myself. I think if you combined the free-standing striking dummy with the arm design I was working (with some modifications that I will probably post about), it would be great — and still probably less than $100. I have seen lots of examples of home-made grappling dummies, and several striking dummies made entirely of car tires, but something in between would be ideal for my purposes. If I get into more grappling, I may make a grappling dummy as well, but that’s not a priority for me at the moment. Anyway, thanks for the comment and I look forward to talking more about training and equipment building!
Thanks, Ryan! I have an idea for a modular striking target system, which is where I was planning to use arms similar to the ones you are working on, so if I can get the frame built I will definitely post up pictures and drawings for that at some point. A grappling dummy would definitely be a great addition, as well–as it stands, I tend to tie a gi top to the heavy bag when I want to work any grappling with it.
[…] and Solo Training and Solo Training 2 by Loren W. Christensen. Punching bags and striking dummies A do-it-yourself, free-standing striking dummy (Back in the Gi) Cheap, light-weight punching bag (Back in the Gi) DIY boxing bag (Warrior’s […]
[…] (Originally posted on Back in the Gi) […]
Thanks Ryan!
You can put faces on your bag, by getting a kneepad – and padding it appropriately behind there, you tape to hold. Then, you get some more foam pad, see, and you
roll the stuff until what you do is, you form, compressed, the basic outline, of a nose, obviously, and some cheek bones. You want to keep yourself and whoever uses the dummy to not punch or whatever, the brow, so for that, you take a piece of stiff hose about a half inch across, and you cut it long enough, that you can arc it across that kneepad.
When you pre-form the pieces, and stick em on before, it’s a lot easier. You keep on going until what you have constructed through rolling and taping those foam pieces, is a kinda oversized face.
To make the forehead seem stiffer, you can cut pieces of plastic bucket out, to make a kind of a brow piece onto which you tape that brow you make with the piece of hose.
The hose I used wasn’t water hose but it was for a kid’s dummy so probably a piece of old, throw away class, cheap water hose is fine for the brow. The objective, see,
is to have a kind of a ‘socket’ situation – the way a man’s nose and eyebrow form that socket, that you pop with the various hammer, sambo, or boxing fists, the old kung fu ‘little fist’ when you’re going to town on some ground and pound on eyes with a lotta real hard back hands…
And the open hand pops of course that make sure he knew you were there because you hydraulically overpressure that eye socket – you all know the drill I’m sure –
and then you tape this, a couple of them usually at a time, onto your bag. If you take some time with some old foam from a couch cushion you found along the road, you can make the thing do a passing duty on a face; and since you have two different kneepads, you can tilt one of them if you want to, make it face sorta down, see –
by taping one end right to the bag, and having the facial portion just hag out, you can fill as you want with foam so it makes a sorta uppercut deal.
You get a few of these from a couple of old knee pads, and put them high and low, and you can work like you’re soccer kicking to the head, etc.
You have to pay, obviously, for the duct tape; but a lot of those old kneepads are at the thrift stores, and when you have four on a bag that has a swivel it’s nice for aiming knees, kicks, whatnot.
Peace
The thing about building dummies is that you can do things for a kid’s dummy you can’t do for an adult’s. If somebody went after it kicking the ones I taped onto the kid’s bag it would tear up if there were shoes, but a kid can chase those things and have a GRAND old time.
Is not hard to do a Plastisol and silicone one like Century Bob. U can make it for 200 dollards i think. Just need a cloth store man figure to make the silicon mold, and then elaborate the base with tires and wood or metal or hard plastic like the real one.